Skip to main content
Welcome to the new DSS website
Help us make it better
Welcome to the new DSS website
Help us make it better
Ministers
(Opens external website)
Accessibility
Our work
Our work
Close
Community support
Community growth
Income Management
Financial counselling
Loans and savings
Social impact investing
Supporting community change
Stronger Places, Stronger People
Supporting people in financial crises
Older Australians
Community connections
Strengthening the Community Sector
Charities and not-for profit support
Strong and Resilient Communities Activity
Volunteering initiatives
Improving digital skills for older Australians
Aboriginal and Torres Strait Islanders
Social security
Income support payments
Australia’s approach to social investment
Try, Test and Learn
International Social Security Agreements
Gambling
Emergency support
Families and children
Family support services
Children
Early childhood
Early Years Strategy
Towards adulthood
Intercountry adoption
Parenting payments and benefits
Paid parental leave
Child support
Families and Children Activity
Help and support for parenting and children
Ending violence and abuse
Child protection
Safety programs, prevention and evidence
Sexual consent
Help and support
National Plan to End Gender Based Violence
Supporting survivors
National Redress Scheme
Forced adoption
Human trafficking and slavery
Forgotten Australians and Former Child Migrants
National Memorial for Victims and Survivors of Institutional Child Sexual Abuse
Assistance for the Bali bombing
Disability and carers
Disability employment
Disability employment programs
Disability employment reforms
Empowering people with disability
International disability rights
Planning for the future
International Day of People with Disabilty
Understanding the Disability Services and Inclusion Act
Disability advocacy
Support with appealing NDIS decisions
Suitable accommodation and supports
Responding to the Disability Royal Commission
Disability strategies
Australia's Disability Strategy
Disability Employment Strategy
National Disability Advocacy Framework
National Autism Strategy
Disability funding and support
Disability Support Pension
Foundational Supports
Disability support services
Funding for disability projects
Help and support for disability
Disability policy reforms
Disability data and research
National Disability Insurance Scheme review and reforms
Supporting carers
Housing and living arrangements
Preventing youth homelessness
Housing support
Home Equity Access Scheme
National Rental Affordability Scheme
Help and support for housing
Housing and homelessness strategy
Work and study
Support for people looking for work
Support for students and apprentices
Approval of Masters courses for education providers
Deductible Gift Recipient Status for marriage education programs
Mental health support
About us
About us
Close
Who we are
What we do
Grant processes
Legislation we administer
Responses to Government inquiries
Long-term research
Campaign certification
Corporate reporting
Budget and Additional Estimates Statements
Senate orders and legal services directions
Corporate plans
Annual reports
Registers
Closing the Gap
Departmental operational information
Commonwealth Child Safe Framework Annual Statement
Doing business with us
Work with us
Careers and employment
Graduate program
Ability Apprenticeships
Committees, councils and other groups
Committees
Councils
Panels and other groups
Access to information
Contact us
Using our website
News
Search
Search
Close
Popular searches
Careers
Disability reform
Foundational Supports
Income support payments
Jobs at DSS
National Rental Affordability Scheme
Organisation chart
Pension age
Menu
Close
Home
Our work
Back
Close
Community support
Back
Close
Community growth
Back
Close
Income Management
Financial counselling
Loans and savings
Social impact investing
Supporting community change
Stronger Places, Stronger People
Supporting people in financial crises
Older Australians
Community connections
Back
Close
Strengthening the Community Sector
Charities and not-for profit support
Strong and Resilient Communities Activity
Volunteering initiatives
Improving digital skills for older Australians
Aboriginal and Torres Strait Islanders
Social security
Back
Close
Income support payments
Australia’s approach to social investment
Try, Test and Learn
International Social Security Agreements
Gambling
Emergency support
Families and children
Back
Close
Family support services
Children
Back
Close
Early childhood
Early Years Strategy
Towards adulthood
Intercountry adoption
Parenting payments and benefits
Back
Close
Paid parental leave
Child support
Families and Children Activity
Help and support for parenting and children
Ending violence and abuse
Back
Close
Child protection
Safety programs, prevention and evidence
Sexual consent
Help and support
National Plan to End Gender Based Violence
Supporting survivors
Back
Close
National Redress Scheme
Forced adoption
Human trafficking and slavery
Forgotten Australians and Former Child Migrants
National Memorial for Victims and Survivors of Institutional Child Sexual Abuse
Assistance for the Bali bombing
Disability and carers
Back
Close
Disability employment
Back
Close
Disability employment programs
Disability employment reforms
Empowering people with disability
Back
Close
International disability rights
Planning for the future
International Day of People with Disabilty
Understanding the Disability Services and Inclusion Act
Disability advocacy
Support with appealing NDIS decisions
Suitable accommodation and supports
Responding to the Disability Royal Commission
Disability strategies
Back
Close
Australia's Disability Strategy
Disability Employment Strategy
National Disability Advocacy Framework
National Autism Strategy
Disability funding and support
Back
Close
Disability Support Pension
Foundational Supports
Disability support services
Funding for disability projects
Help and support for disability
Disability policy reforms
Disability data and research
National Disability Insurance Scheme review and reforms
Supporting carers
Housing and living arrangements
Back
Close
Preventing youth homelessness
Housing support
Home Equity Access Scheme
National Rental Affordability Scheme
Help and support for housing
Housing and homelessness strategy
Work and study
Back
Close
Support for people looking for work
Support for students and apprentices
Approval of Masters courses for education providers
Deductible Gift Recipient Status for marriage education programs
Mental health support
About us
Back
Close
Who we are
What we do
Back
Close
Grant processes
Legislation we administer
Responses to Government inquiries
Long-term research
Campaign certification
Corporate reporting
Back
Close
Budget and Additional Estimates Statements
Senate orders and legal services directions
Corporate plans
Annual reports
Registers
Closing the Gap
Departmental operational information
Commonwealth Child Safe Framework Annual Statement
Doing business with us
Work with us
Back
Close
Careers and employment
Graduate program
Ability Apprenticeships
Committees, councils and other groups
Back
Close
Committees
Councils
Panels and other groups
Access to information
Contact us
Using our website
News
Ministers
(Opens external website)
Accessibility
Ministers
(Opens external website)
Accessibility
Home
Home
fig_4.jpg
Listen
fig_4.jpg
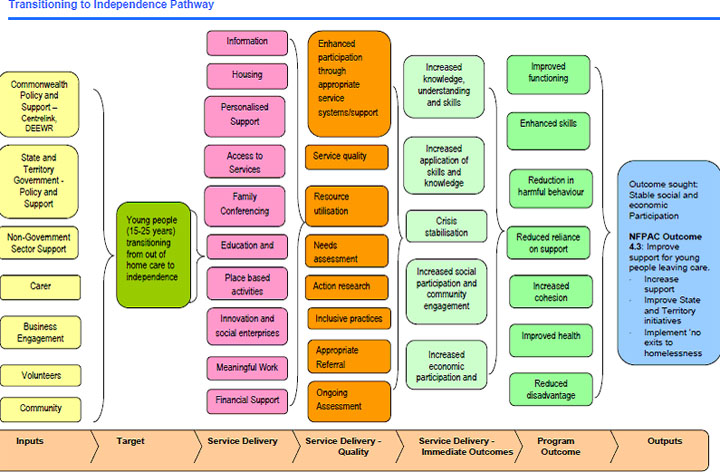
Figure 4: Transitioning to independence pathway
Back to top